Configuring usage-based billing in the Atomia Platform.
Before you begin
Before you begin you should think through what products you want to offer and at what price. The different sizes of virtual machines is defined using OpenStack flavors where you can configure number of virtual cpus, amount of memory and root disk.
The following steps need to be performed in order to setup Atomia to work with usage based billing:
- Setup your products in Atomia Billing
- Enable usage data collection in Atomia
- Enable post paid invoice handler in Atomia
- Configure Atomia Hosting control panel for usage based mode
Setup your products in Atomia Billing
There are two default products in the default installation of Atomia to use for billing usage based. The article numbers for these products are VPS-LINUX and VPS-WINDOWS. The main difference between these and “normal” products is the precense of counters for usage based pricing. These counters define the price per time unit for a certain flavor (counter id).
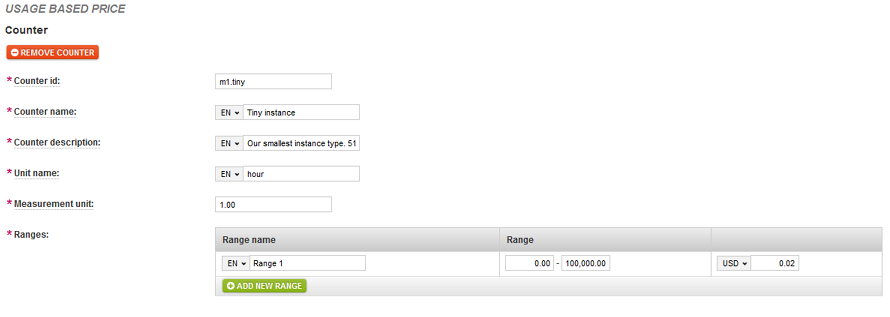
Image 1: Usage counter.
Counter id should match the id of the flavor you which to define a price for. Ranges defines the actual price per time unit, it is possible to define different price for different ranges if for example you would like to have a different price after 100 hours of usage during a month.
Use the default products and define the price for your different flavor/counters or create new products
Atomia supports usage based billing for several OpenStack services: VPS instance usage hours, Cinder volumes usage, Snapshot usage and Bandwidth (outgoing/incoming). Products for these are not set up by default but are described below.
Cinder volumes: Create a new product with the following values
- Provisioning service: None
- Provisioning allowed: Allowed without payment
- Product category: Cloud service
- Article number: VPS-VOL (If you use another article number make sure to change this in the usage data collection settings)
- Name/Description: A descriptive name and description for the volume product.
- Taxes: Your preferred tax settings, not covered by this documentation.
- Type of billing: Usage based price
- Counter: You should create a seperate counter for each volume type you want to offer.
- Counter id: Id of the counter. (IMPORTANT: the counter id must match the name of the volume type in OpenStack)
- Counter name/description: Name and description shown on invoices and in HCP.
- Unit name: GB
- Measurement unit: 1
- Ranges: Configure the price ranges you require, for example the first 0-100GB of volume space can have one price and the next 101-500GB another.
- Options: For default configuration you can leave these as is.
In order for the newly created product to be available you also need to edit the OpenStack modules configuration file which is on the Automation Server machine at: C:\Program Files (x86)\Atomia\AutomationServer\Common\Modules\Atomia.Provisioning.Modules.OpenStack.dll. Modify the AvailableVolumeTypes setting to match the product(s) you created
	'AvailableVolumeTypes': [
		{
			'name': {
				'default': 'Standard volume'
			},
			'description': {
				'default': 'Regular performance'
			},
			'product_id': 'VPS-VOL',
			'counter_id': 'Standard'
		}
	]
You should now be able to add volumes and get charged for usage.
Cinder snapshots: Create a new product with the following values
- Provisioning service: None
- Provisioning allowed: Allowed without payment
- Product category: Cloud service
- Article number: VPS-SNAP (If you use another article number make sure to change this in the usage data collection settings)
- Name/Description: A descriptive name and description for the snapshot product.
- Taxes: Your preferred tax settings, not covered by this documentation.
- Type of billing: Usage based price
- Counter: You can currently only have one counter for snapshots.
- Counter id: Id of the counter. (This can be anything)
- Counter name/description: Name and description shown on invoices and in HCP.
- Unit name: GB
- Measurement unit: 1
- Ranges: Configure the price ranges you require, for example the first 0-100GB of snapshot space can have one price and the next 101-500GB another.
- Options: For default configuration you can leave these as is.
No more configuration is needed, you will now bill for all created snapshot according to the configuration in this product.
Bandwidth: Create a new product with the following values
- Provisioning service: None
- Provisioning allowed: Allowed without payment
- Product category: Cloud service
- Article number: VPS-BANDWIDTH (If you use another article number make sure to change this in the usage data collection settings)
- Name/Description: A descriptive name and description for the bandwidth product.
- Taxes: Your preferred tax settings, not covered by this documentation.
- Type of billing: Usage based price
- Counter: You should create two counters one for outgoing and one for incoming bandwidth
- Counter id: Id of the counter. (Should be either Outgoing or Incoming)
- Counter name/description: Name and description shown on invoices and in HCP.
- Unit name: GB
- Measurement unit: 1
- Ranges: Configure the price ranges you require, for example the first 0-100GB of bandwidth can have one price and the next 101-500GB another.
- Options: For default configuration you can leave these as is.
No more configuration is needed, you will now bill for all consumed bandwidth according to the configuration in this product.
Enable usage data collection in Atomia Billing
In order for Atomia to be able to invoice customers for virtual machine usage it needs to collect data from OpenStack to base invoicing on. To perform this task Atomia Billing comes with the plugin “Usage data collection” which is enabled by default. If it should be disabled enable it by logging into the Admin Panel and click on Settings > Plugin configuration.
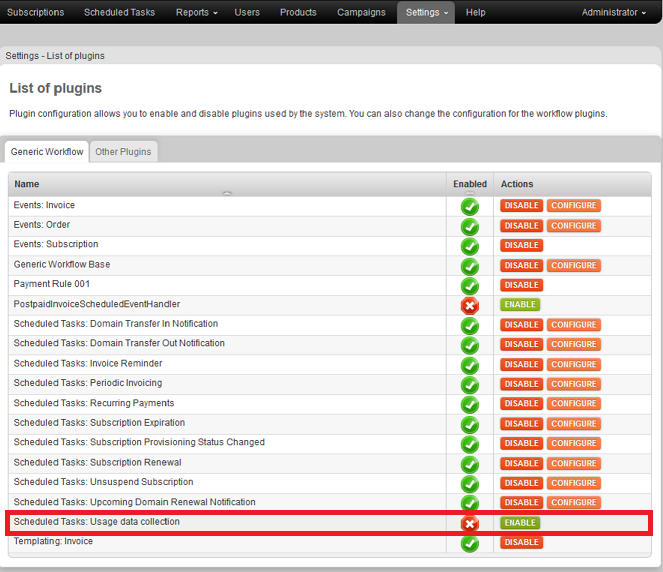
Image 2: Usage data collection.
Simply click on Enable to activate the plugin. When the plugin is active a configuration button should appear which will allow you to set a couple of options, the available options are.
- Timestep: The time interval in hours to check for usage data, the default value of 1 will update usage in 1 hour chunks.
- VPS instance service: The name of the VPS instance service, the default name is EC2Instance. You will most likely never need to change the service names.
- Volume service: The name of the volume service, the default name is EC2Volume.
- Volume product: The product to use for calculating usage based volumes.
- Snapshot service: The name of the snapshot service, the default name is EC2Snapshot.
- Snapshot product: The product to use for calculating usage based snapshots.
- Bandwidth product: The product to use for calculating usage based bandwidth.
- Charge when shut down: When setting to true instance usage will be counted when the virtual machine is turned off.
You also need to enable a scheduled task that will call the plugin at regular intervals. A scheduled task is already prepared but paused by default, you can find it under Settings > Scheduled task settings look for UsageDataScheduledEventHandler. Click the check box right next to it and select Run now / Resume and it will be activated with the default interval of every hour.
Enable post paid invoice handler in Atomia
The post paid invoice handler manages the generation of invoices from usage based data collected by the Usage data collector plugin. It should be enabled by default and is found on the same plugin page as the usage data collector above, look for Scheduled Tasks: Post Paid Invoice.
There is also a matching scheduled task under Settings > Scheduled task settings that you need to enable in order to invoicing to happen, look for PostpaidInvoiceScheduledEventHandler and enable it.
Configure Atomia Hosting control panel for usage based mode
The Atomia Hosting Control Panel works differently when in usage based and subscription based mode, the default is usage based so if this is a first time installation no change is required but for reference you need to set the EnableUsageBased pluginSetting to true in the HCP VPS config file found at: C:\Program Files (x86)\Atomia\HostingControlPanel\bin\Atomia.Web.Plugin.VPS.dll.config.