This guide covers the different Atomia Atoms types and their placement in the Atomia system.
Overview
There are several Atom types that allow different customizations of the Atomia system. The currently available types are the following:
- Payment plugin
- Provisioning module
- DomainReg plugin
- SSL plugin
- Provisioning handler
- HCP generic page
- Resource assignment plugin
- Single sign-on
To get a better understanding of which Atom type you need to develop and where to implement your functionalities, see the image below that shows the placement of each Atom type in the Atomia system:
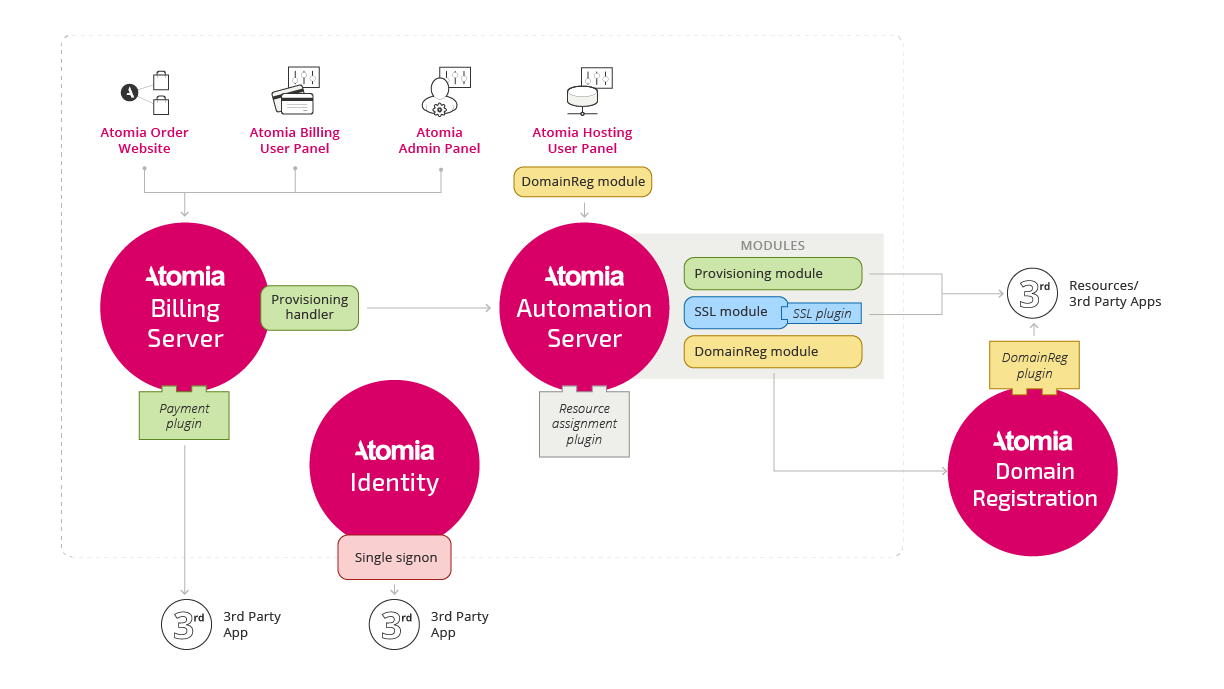
Image: Atoms types and their placement in Atomia.
Provisioning handler plugin Atom
The provisioning handler plugin is a module placed in the Atomia Billing Core component. It connects the Atomia Billing Server to the external systems (such as Atomia Provisioning) to provision purchased services.
The provisioning handler plugin implements the IProvisioningHandler interface. The methods that need to be implemented are:
- AddProduct – Called when a new subscription is added in the Atomia system.
- ModifyProduct – Called when a subscription is modified — including suspend, unsuspend, and upgrade actions (modify operation type is contained in input parameter
additionalData["ModifyOperation"]). - RemoveProduct – Called when a subscription is removed.
- RenewProduct – Called when a subscription renewal event occurs.
- GetProvisioningService – Called to get provisioning service object from the Automation Server.
When implementing methods the main focus should be on creating, modifying, and deleting provisioning service objects for specific subscriptions. Do changes on Atomia Billing API objects if needed. Information about existing Automation Server services can also be retrieved.
Create the following object to communicate with the Atomia Automation Server using the Atomia Automation Server Core API:
ICoreApi coreService = new CoreApiProxy();
Available methods can be found in Automation Server Core API documentation. If you need to update a subscription object or perform any other action on Atomia Billing API objects we recommend you to use the helper methods from Atomia.Billing.Core.Sdk.
For exception handling in the provisioning handler, the namespace Atomia.Billing.Core.Sdk.Exceptions has to be added in the class. The exception instance is generated using AtomiaProvisioningException class and thrown. Example:
try
{
  ...
}
catch (Exception ex)
{
   throw new AtomiaProvisioningException(ex.Message, ex);
}
Deployment in environment
When the custom provisioning handler is developed, the handler dll file has to be copied to the following location: C:\Program Files (x86)\Atomia\BillingAPIs\BillingApi\Bin
In the Billing API Web.config file several sections has to be added to enable the use of a new handler in the system:
configuration / atomiaBilling / provisioning order
Add a provisioningOrder element with a provisioningService attribute. This value contains the name of a custom provisioning service and the order attribute, which value indicates order in provisioning process.
configuration / atomiaProvisioningConfiguration / provisioningDescriptionMappings / provisioningDescription / packages
Add a package element with a name attribute. This value contains the name of a custom product and type attribute with the value custom.
configuration / atomiaProvisioningConfiguration / atomiaProvisioningHosting / customProducts
Add a customProduct element with a name attribute. This contains the name of a custom product, the provisioningService attribute which value contains the name of custom provisioning service, and handlerClass with the full name of the type that represents the custom provisioning handler value (Namespace.Type, Assembly). This element can contain a customProductProperties element and inside it property elements can be defined with name and value attributes.
All these Web.config file changes should be placed in an xml transformation file with the name Web.[provisioning service name].config and placed in the following location: C:\Program Files (x86)\Atomia\BillingAPIs\BillingApi\Transformation Files
Example of a transformation file:
<?xml version="1.0" encoding="utf-8"?>
<configuration xmlns:xdt="http://schemas.microsoft.com/XML-Document-Transform">
 <atomiaBilling xmlns="atomiaBilling">
  <provisioningOrders>
   <provisioningOrder provisioningService="WhoisProtection" order="30" xdt:Transform="Insert" />
  </provisioningOrders>
 </atomiaBilling>
 <atomiaProvisioningConfiguration xmlns="atomiaProvisioning">
  <provisioningDescriptionMappings>
   <provisioningDescription name="ProvisioningDescription">
    <packages>
     <package name="WhoisProtection" type="Custom" xdt:Transform="Insert" />
    </packages>
   </provisioningDescription>
  </provisioningDescriptionMappings>
  <atomiaProvisioningHosting>
   <customProducts>
    <customProduct name="WhoisProtection" provisioningService="WhoisProtection" handlerClass="Atomia.Billing.Plugins.ProvisioningPlugins.AtomiaProvisioningPlugin.WhoisProtectionProvisioningHandler, Atomia.Billing.Plugins.ProvisioningPlugins.AtomiaProvisioningPlugin" xdt:Transform="Insert">
     <customProductProperties>
      <property name="DomainPropertyNames" value="WhoisProtectionEnabled" />
     </customProductProperties>
    </customProduct>
   </customProducts>
  </atomiaProvisioningHosting>
 </atomiaProvisioningConfiguration>
</configuration>
Once the transformation file is placed in the mentioned location, run the following file to recreate Billing API Web.config file: C:\Program Files (x86)\Atomia\BillingAPIs\Recreate config files.lnk
When the above mentioned changes have been performed in the environment, a newly created provisioning service becomes available in the dropdown list in Atomia Admin Panel > Add new product.
Provisioning module Atom
The provisioning module is a part of the Atomia Automation Server. Its role is in actual provisioning of services on a specific resource, such as a web server, database, DNS, etc. Each module is specified to work with one type of resource. For example the IISModule is provisions and manages services on the Microsoft IIS platform.
The provisioning module main class extends the CommandPatternModuleBase abstract class. Two methods should be overridden here:
- GetServiceDescriptionAssemblyPath – Return path to defined service description xml file.
- GetServiceNameToCommandClassTypeMapping – Maps each service name with command class.
Each command class extends ModuleCommandSimpleBase and overrides the following methods:
- ExecuteAdd – Called when a new service is created in the Atomia Automation server.
- ExecuteRemove – Called when an existing service is deleted in the Atomia Automation server.
- ValidateService – Validates the service and its properties before it commands execution (
TypeValidatorclass fromAtomia.Provisioning.Modules.Commoncan be used for validation). - ExecuteModify (optional) – Called when an existing service is modified in the Atomia Automation Server.
- CallOperation (optional) – Called for any custom defined operation.
In addition to these five most important classes, there are several more optional methods that can be overridden. The list is available in ModuleCommandSimpleBase class. The main focus in the provisioning module is to get the necessary information from received module service properties and to call the appropriate methods in third party applications, or to execute actions on resources. Any changes on a module service object within methods are saved automatically in the Automation Server database.
The description of services that is handled by the provisioning module, their properties, custom operations, child services, and action hooks needs to be defined in the ServiceDescription.xml file. This should also be done to describe which resource that should be used for service provisioning in the resources file. See the documentation for defining services, packages and resources.
For the exception handling in the provisioning module the namespace Atomia.Provisioning.Modules.Common should be added in the class. An exception instance should be generated using the ExceptionHelper.GetModuleException method and thrown. Example:
try
{
  ...
}
catch (Exception ex)
{
  string exId = "ID400001"; //unique id for this type of exception
 Dictionary<string, string> data = new Dictionary<string, string>()
  {
    { "ServiceId", moduleService.LogicalID },
    { "ExceptionMessage", ex.Message }
  }; //dictionary with the data that will be placed in error message
  bool retryProv = false; //try to retry provisioning after error occurs
  throw ExceptionHelper.GetModuleException(exId, data, ex, retryProv);
}
A resource file with the name ExceptionMessages.resx should be created in the module project root. It should contain an entry with the same exception id as key.
Name | Value | Comment
--------------------------------------------------------------------------------
ID400001 | Service id {0}: Exception message: {1} |
{0} and {1} will be replaced with dictionary values.
Deployment in environment
For deployment of a custom provisioning module, the module files should be copied to the following location:
C:\Program Files (x86)\Atomia\AutomationServer\Common\Modules
The defined service description configuration and resources configuration have to be included in the Automation server configuration files (by using transformation files). They can be found in the following locations:
- C:\Program Files (x86)\Atomia\AutomationServer\ Common\ProvisioningDescriptions\ProvisioningDescription.xml
- C:\Program Files (x86)\Atomia\AutomationServer\Common\Resources.xml
Examples of the existing service descriptions and resource descriptions can be found in these two files.