Overview
The purpose of this document is to describe how can Atomia be used to sell Azure services to your customers, keep track of their usage of those services and make invoices for that usage.
Integration is designed for members of Microsoft’s Cloud Solution Provider program and it works by creating tenants in Azure for every end user. Using those tenants, users can consume Azure services (like creating machine instances) directly in Azure portal, while receiving invoices for consumption through Atomia platform.
Section “Installation and configuration” below guides you through setting up the integration and section “System overview” describes how components interact with each other and details their behavior.
Before you begin
Integration is designed for members of Microsoft’s Cloud Solution Provider (CSP) program and it’s not possible to be set up and used without a CSP license.
Installation and configuration
This section guides you through setting up the integration.
There are two places where installation/configuration is needed. The first one is Microsoft Partner Center portal, and the second one is Atomia system.
Microsoft Partner Center
You will need to create a Native App in the Microsoft Partner Center portal, then add the app to Admin agents group and, finally, if you want, you can change user password expiration policy to never expire. We strongly recommend updating password expiration policy, because if you skip this step, then the password will expire on every two months, and you’ll need to update configuration each time you change the password. If you already did this as part of setting up Office 365 integration you can skip this section.
Create a Native App
To create a Native App, you’ll need to:
- Go to the Microsoft Partner Center, log in with your CSP credentials and go to your Dashboard
- Go to Gear icon (left of the name in the upper right corner) > View all settings > App Management
- Click on Add new native app
Name of the native app is not important, however, rest of the data (App ID, Account ID, Commerce ID and Domain) is needed for configuring Atomia platform later on.
Add the application to admin agents group
After successful creation of the Native App, execute the following PowerShell script:
Connect-AzureAd

#Find the group that represents the Adminagents.

$group = Get-AzureADGroup -Filter "displayName eq 'Adminagents'"

#Find the service principal that has the same appId as your app.

$sp = Get-AzureADServicePrincipal -Filter "<strong>{AppId}</strong>'"

#Finally, add the service principal to the Adminagents group.

Add-AzureADGroupMember -ObjectId $group.ObjectId -RefObjectId $sp.ObjectId
{AppId} is AppId from the Native app that you have created earlier.
This script will add the native app to the admin agents group. By being in this group, native app will have necessary permissions to create/suspend subscriptions, add users to customers, add domains, etc.
Set up CSP password to never expire
To change user’s password expiration policy to never expire, you’ll need to:
- Have username/password for CSP user (or his admin)
- Install Microsoft Online Services Sign-in Assistant for IT Professionals RTW.
- Install Windows Azure Active Directory Module for Windows PowerShell
- Follow this guide (ignore “Install the required PowerShell modules” point 1. and 2. from the guide, and start at point 3 of that section)
Automation server
Setting up Automation server consists of adding a resource to the Resources.xml file and setting up which provisioning packages should have Azure support.
Adding a resource
All resources are in the Resources.xml file. There is already a binding for module Atomia.Provisioning.Modules.MsCSP.MsCSP, with commented out example resource configs. If you set up Office 365 integration majority of the properties will already be configured you can just add the missing ones.
Example config:
<bindings>
 <moduleList>
 <module name="Atomia.Provisioning.Modules.MsCSP.MsCSP" resourceAsignmentPolicy="RoundRobin" />
 </moduleList>
 <resourceList>
 <resource name="MsCSPAzureResource">
 <property name="Username">[email protected]</property>
 <property name="Password">somestrongpass</property>
 <property name="NativeAppId">72c4f12c-fcf6-4bfd-908f-f022685d8880</property>
 <property name="AzureDurableOfferId">OfferIdFromCSPPortal</property>
 <property name="PartnerCenterEndpoint">https://api.partnercenter.microsoft.com</property>
 <property name="AuthentificationEndpoint">https://login.microsoftonline.com/</property>
 <property name="GraphEndpoint">https://graph.windows.net</property>
 <property name="ResourceManagerEndpoint">https://management.azure.com/</property>
 <property name="ManagementEndpoint">https://management.core.windows.net/</property>
 <property name="CommonDomain">common</property>
 <property name="RefreshToken"></property>
 <dbOverrideList name="Office365OverrideList">
 <propertyListItem>RefreshToken</propertyListItem>
 </dbOverrideList>
 </resource>
 </resourceList>
</bindings>
Properties explanation:
- Username – CSP user to use when authenticating with API endpoints.
- Password – Password for the CSP user.
- NativeAppId – Native application ID from partner center
- AzureDurableOfferId – Offer id for the Azure subscription
- CommonDomain – The authority url path used to obtain access token. This must be set to common.
Rest of the properties (that end with Endpoint) are URLs to different API endpoints and can stay like in the example.
If multiple resellers in Atomia have their own CSP accounts, then there should be a resource for each CSP and resourceAsignmentPolicy should be “ResellerSpecific”.
Here is an example for two resellers with a CSPs:
<bindings>
 <moduleList>
 <module name="Atomia.Provisioning.Modules.MsCSP.MsCSP" resourceAsignmentPolicy="ResellerSpecificArbitraryPolicy" />
 <module name="Atomia.Provisioning.Modules.MsCSP.MsCSP" resourceAsignmentPolicy="RoundRobin" />
 </moduleList>
 <resourceList>
 <resource name="MsCSPAzureResource1">
 <property name="ResellerSpecific.PolicyAgent">RoundRobin</property>
 <property name="Username">[email protected]</property>
 <property name="Password">somestrongpass</property>
 <property name="NativeAppId">72c4f12c-fcf6-4bfd-908f-f022685d8880</property>
 <property name="PartnerCenterEndpoint">https://api.partnercenter.microsoft.com</property>
 <property name="AuthentificationEndpoint">https://login.microsoftonline.com/</property>
 <property name="GraphEndpoint">https://graph.windows.net</property>
 <property name="ResourceManagerEndpoint">https://management.azure.com/</property>
 <property name="ManagementEndpoint">https://management.core.windows.net/</property>
 <property name="CommonDomain">common</property>
 <property name="ResellerSpecific.AllowSubresellers">all</property>
 <propertyList name="ResellerSpecific.AllowedResellerIds">
 <propertyListItem>100000</propertyListItem>
 </propertyList>
 </resource>
 <resource name="MsCSPAzureResource2">
 <property name="ResellerSpecific.PolicyAgent">RoundRobin</property>
 <property name="Username">[email protected]</property>
 <property name="Password">somestrongpass</property>
 <property name="NativeAppId">72c4f12c-fcf6-4bfd-908f-f022685d8880</property>
 <property name="PartnerCenterEndpoint">https://api.partnercenter.microsoft.com</property>
 <property name="AuthentificationEndpoint">https://login.microsoftonline.com/</property>
 <property name="GraphEndpoint">https://graph.windows.net</property>
 <property name="ResourceManagerEndpoint">https://management.azure.com/</property>
 <property name="ManagementEndpoint">https://management.core.windows.net/</property>
 <property name="CommonDomain">common</property>
 <property name="ResellerSpecific.AllowSubresellers">all</property>
 <propertyList name="ResellerSpecific.AllowedResellerIds">
 <propertyListItem>100001</propertyListItem>
 </propertyList>
 </resource>
 </resourceList>
</bindings>
Setting up packages
For every package that should support Azure in <packageDescription> in the ProvisioningDescription.xml file, it’s needed to do the following steps:
- Add:
<service name="CsMsCSP" />
under <serviceList> section.
- Add:
<group maxCount="1">
<service name="CsMsCSP" />
</group>
under <serviceLimitationList> / <globalLimitation> section
- If you want to use only Azure integration without the Office 365 integration, add the following limitation to the section from 2:
<group maxCount="0">
<service name="MsCSPOffice365Subscription" />
</group>
Billing API
Scheduled tasks
There are four scheduled tasks used to support Azure integration: Rate card, Usage, Invoicing and Subscription role tasks. First three tasks have joint configuration while the last one has no specific configuration. Turning the tasks on and specifying how often to run is done in Atomia Admin panel > Settings > Scheduled task settings page.
All tasks behaviors are closely described in “System overview” section.
Rate card, Usage and Invoicing plugin configuration
These three tasks have a joint configuration. Configuration can be set up in Admin panel > Settings > Plugin configuration page. There is a base plugin called AzureBaseScheduledEventHandler which holds the configuration that the three tasks inherit. To add or edit the configuration, press the button configure next to AzureBaseScheduledEventHandler.
The button opens the configuration page. Configuration is done for every reseller that has a CSP account. The configuration has the following fields:
- Reseller id – Account id in Atomia of the reseller with CSP account.
- Username – CSP user to use when authenticating with API endpoints.
- Password – Password for the CSP user.
- Application Id – Native application ID from partner center.
- Common Domain – Value must be common
- Billing Period Day – Day in a month when Microsoft starts new billing period for the CSP.
- Resource Url – (Optional) The URL of the partner center API. Default: https://api.partnercenter.microsoft.com
- Partner Service API Endpoint – (Optional) The Microsoft CSP’s partner service API endpoint. Default: https://api.partnercenter.microsoft.com
- Authentication Authority Endpoint – (Optional) The Microsoft CSP’s authentication authority endpoint. Default: https://login.windows.net
- Graph Endpoint – (Optional) The Microsoft CSP’s graph endpoint. Default: https://graph.windows.net
- Usage Customers Page Size – (Optional) Page size when fetching tenants from Azure, in order to check their usage. Default: 1000
- Azure Subscription Service – (Optional) Name of the service in Automation server for the Azure subscription. Default: MsCSPAzureSubscription
- Incomplete Usage Invoice Day – (Optional) Used to configure if Azure invoice should be created even if usage wasn’t marked as completely collected if the value is configured. Value is the day of the month when to create Azure invoice if usage not complete. In other words, how long to wait for usage collection to be completed.
- Incomplete Usage Notification Day – (Optional) Used to configure if when to send a notification to reseller when usage wasn’t marked as completely collected if the value is configured.
- Collect Unmatched Usage – (Optional) If true, usage will be collected and stored even if Azure subscription can’t be matched to any customer in Atomia. Default: false
- Invoice Calendar Months – (Optional) If true, invoices will be created for calendar months (from the first of the month to the first of next month). If false, invoicing period will match the billing period that CSP has towards Microsoft. Default: false
- Currencies – (Optional) Reseller’s list of currency codes. Default: currencies from reseller configuration.
- Currency Regions – (Optional) The reseller’s region for currencies to send to Microsoft when fetching rate card.
Rate card
Full name of this task is AzureRateCardScheduledEventHandler. The first run of the task is used to fetch and store rates that Microsoft gives to the CSP. All other runs are to fetch any changes that Microsoft might have introduced. It is enough that this task runs once a day.
Usage
Full name of this task is AzureUsageScheduledEventHandler. It fetches all the missing usage in Atomia from Azure. That usage data is used when invoicing. Usage is fetched up until the day before the current day. The first iteration of the day fetches everything that’s missing, rest of the iterations are a failsafe is something goes wrong during the first. Sometimes Microsoft doesn’t have data prepared immediately at the beginning of the day. It should run multiple times a day, the default setup is hourly.
Invoicing
Full name of this task is AzureInvoicingScheduledEventHandler. It creates invoices based on the fetched usage data. Invoices are created every first of the month. If usage data is still not ready on the first of the month, invoicing waits until usage data fetching is marked as completed. The first iteration of the month usually creates all the invoices, rest of the iterations are a failsafe is something goes wrong. It is enough that this task runs twice a day.
Subscription role
Full name of this task is AzureAssignSubscriptionRoleScheduledEventHandler. It’s used to give permissions to the end user to add resources inside of his Azure subscription. Microsoft requires this to be explicitly done, but it can only be done after the initialization is done by Microsoft which takes a minute or two. That’s why this is in a scheduled task. It should run every 2-5 minutes to ensure user gets a full access as soon as possible.
Set up products
-
- Go to Admin Panel > Products > Products > Add new product.
- Set the following data.
- Provisioning service: MsAzure.
- Product category: Extra service.
- Provisioning allowed: Allowed after payment
- Type of Billing: Fixed price (Nonrecurring) and also Usage based price.
- Fill article number, name and description as desired
- Under Fixed price, set the initial price of buying an Azure subscription. Price can be zero, and then there will be no cost to the user to create a new Azure subscription. If the price is specified, the user will have to pay that amount in advance. Later invoices for usage will be discounted until that amount is used up.
- Add Azure markups. Markups are in percentages and means that when invoicing a customer for some usage, his price will be the price from your CSP rate card, increased for the markup percentage. You can add markups with overwrites for reseller, resource category, subcategory, region, name, and resource Id.

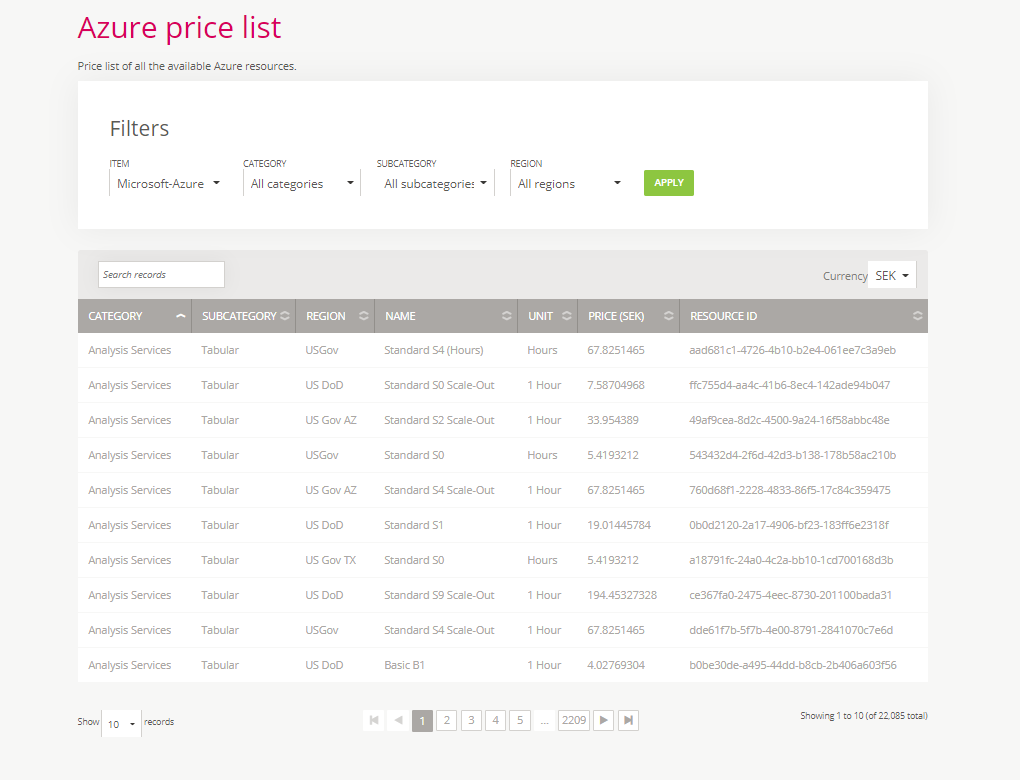
To see all Azure resources go to Hosting control panel, select your account (reseller account) and go to the Azure price list page.
- Under Usage based price, add one counter with tiered pricing and rest of the fields can be filled out with any values (counter is not really used, it just acts as a placeholder)
- Add the following to Other data:
- Name: allowmultiple
- Value: true
- Name: tos
- Value: Because Microsoft introduced a customer acceptance confirmation before any order or quantity change, you have to add this attribute. The value is resource key in tos default resource file (NewDefaultCommon) which should have a link to Microsoft cloud agreement template.
- Fill out the rest of the properties as you require.
- Add two-step termination with termination period of 60 days. This is under termination configuration section on the page for adding a new product.
- Example of a created product can be seen in the vanilla installation of Atomia with article number: MS-AZURE-DEFAULT.
Package product
You’ll need to also add one custom attribute to the product for the main package which has Azure included (Automation Server > Setting up packages part of this overview). Custom attribute to add:
- hasextraservices with value true
Set up shop
For a previously defined Azure item to be listed on Extra services page as available for purchase, it must be added to Default shop. Go to Admin Panel > Products > Shops > Default shop. Add the Azure subscription (described in the previous section) to the shop with category: ExtraService.
Cloud store
The Atomia store has a new option where it is possible to just sign up, without purchasing anything. In the background, some free configured package will be provisioned for the customer.
To configure which package should be created in this scenario, in Atomia Store’s Web.config, add inside the <appSettings> section:
<add key="DnsPackageArticleNumber" value="DNS-PACKAGE-ARTICLE-NUMBER" />
where value is article number of the package. The default setting value (when nothing is configured) is DNS-PK.
To open this version of the store, go to {store_url}/Account?flow=CloudSignup. For example https://store.atomia.com/Account?flow=CloudSignup
System overview
This section gives a more detailed info on how the integration works, once it’s set up.
Scheduled tasks
Rate card
Rate card task is used to fetch CSP’s rate card from Microsoft. The rate card is fetched for every Atomia reseller that has a CSP account and for every configured reseller currency (note: more often than not, currencies require a region to be configured as well). On every task run, it is checked if there are new changes in the rate card. New changes are stored in the database, but old ones are not removed. Every rate from the rate card has an effective date assigned to it, and that’s what determines which rate is currently valid.
New tables are created in the Atomia Billing database for storing the rate card. Table azure_resource holds the general information about the Azure resources and table azure_resource_rate holds all the rates per currency, reseller and used amount range.
Usage
Usage task fetches consumed usage on Azure for all the customers’ subscriptions. The task starts by first fetching a list of customers from Azure and after that, for each customer, a list of his Azure subscriptions is fetched. Then, task iterates through all the subscriptions and does the following:
- Check if Azure subscription can be matched with a subscription and customer in Atomia. Matching is done by checking if there is a service in Atomia Automation with the Azure subscription id like the one currently processed.
- If subscription can’t be matched, based on Collect Unmatched Usage subscription is skipped (and task continues to the next one) or processed without matching.
- On further processing, the task checks what is the last day that there is usage data stored in the database. If the last usage date is yesterday’s date, then that means that there is no new usage to be fetched from Azure for that subscription and it’s skipped. If the last usage that is stored is from a day older than yesterday, usage is fetched for all the missing days concluding with yesterday. If there is no usage at all, usage is fetched since the subscription’s creation day.
- Once the usage is fetched from Azure, it is grouped by day and resource and stored in the database.
New table azure_usage is created in the Atomia Billing database for storing the usage data.
Invoicing
Invoicing task creates monthly invoices based on the consumed usage from the previous month. The task first gets a list of customers with not yet invoiced usage. Then for each of those customers, the following is done:
- It’s determined which is the parent reseller that has a rate card (CSP reseller). Also, it’s determined if there are any resellers between the customer and the reseller with the rate card. If there are, they fetched so that it can be checked for all of them.
- All not invoiced usage data is retrieved from the database up until the end of the previous month.
- Usage data is seperated per Azure subscription.
- The rate card is selected. Depending on Invoice Calendar Months configuration, there are two scenarios.
- Billing period invoicing.
- Since invoice period matches the billing period in Microsoft, the rate that is picked is the one valid at the start of the period for existing Azure subscriptions. For new subscriptions, rate is picked from the day when the subscription is created.
- Calendar months invoicing. Note: Because Atomia and Microsoft are making invoices for different periods, it is inherently possible that invoices are not identical (for example, usage from first to first can fall into one range of the rate and usage for billing period can fall into different range).
- For existing subscriptions, it is important when the Billing Period Day is because Microsoft invoices CSPs based on their billing period day. If the billing period day is something other than the first day of the month, then there are two different rates that are important: rates on the billing period day of the invoicing month and rates on the billing period day of the month before.
This is important because Microsoft is billing for the usage from one billing period day until the next one. Microsoft uses rates valid at the start of the billing period but can change some of them for the next billing period. As there is a mismatch between when Microsoft invoices CSP and when CSP invoices customers (and invoicing is done for the partial usage of the current billing period), it’s possible for the invoices to be different. As a measure of precaution, for each used Azure resource, the bigger rate between the two is picked to be used when invoicing. - For new subscriptions that are created during the billing period, rate card used for all the usage is the one on the subscription’s creation date. If the subscription is created before the billing period day of the month, usage between the subscription creation date and billing period day of the month is invoiced based on the rate card valid on the subscription date. Usage after the billing period day is invoiced based on the rate card valid on the billing period day.
- For existing subscriptions, it is important when the Billing Period Day is because Microsoft invoices CSPs based on their billing period day. If the billing period day is something other than the first day of the month, then there are two different rates that are important: rates on the billing period day of the invoicing month and rates on the billing period day of the month before.
- Billing period invoicing.
- Markups are selected.
- All markups for resellers between the customer and the CSP reseller (including the CSP reseller) are retrieved. Out of those markups, for each usage entry and for each markup reseller, the most accurate markup is picked to be applied. Picking the markups is done as described in the “Markup selection flow” section.
- At this point, for each usage entry, it’s known what rate card and which markup from each reseller should be applied.
- Price for the used resource is calculated like: rate from the rate card increased for the percentage of each reseller’s selected markup. Example:
rate = 10
markup1 = 20%
markup2 = 10%
markup3 = 15%
price = 10 * 1.2 * 1.1 * 1.15 = 15.18
Markup selection flow
Markup is defined based on the following Azure resource criteria: category, subcategory, region, name, and id. When a markup for a specific Azure resource is looked for, it is first checked if there is a markup where resource id is the same as the id of the resource in question (lookup resource). If there is no markup like that, the markup is looked for by checking conditions in the following order. The first condition that is fulfilled picks the markup:
- Markup resource id is empty, markup resource name matches lookup resource name and markup resource subcategory, region and category either match lookup resource or are “*”.
- Markup resource id is empty, markup resource name is “*”, markup resource subcategory matches lookup resource subcategory and markup resource region and category either match lookup resource or are “*”.
- Markup resource id is empty, markup resource name and subcategory are “*”, markup resource region matches lookup resource region and markup resource category either match lookup resource or is “*”.
- Markup resource id is empty, markup resource name, subcategory, and region are “*”, markup resource category matches lookup resource category.
- If previous conditions are not met, default markup is picked where markup resource id is empty and markup resource name, subcategory, region, and category are “*”.
Pages
Displaying azure tiles
If your reseller(s) doesn’t want to have azure tiles visible in Hosting Control Panel, you can set a flag with name ShowAzureToReseller located in Atomia.Web.Plugin.Azure.dll.config. Set to key to true (false) if you want to display (or not).
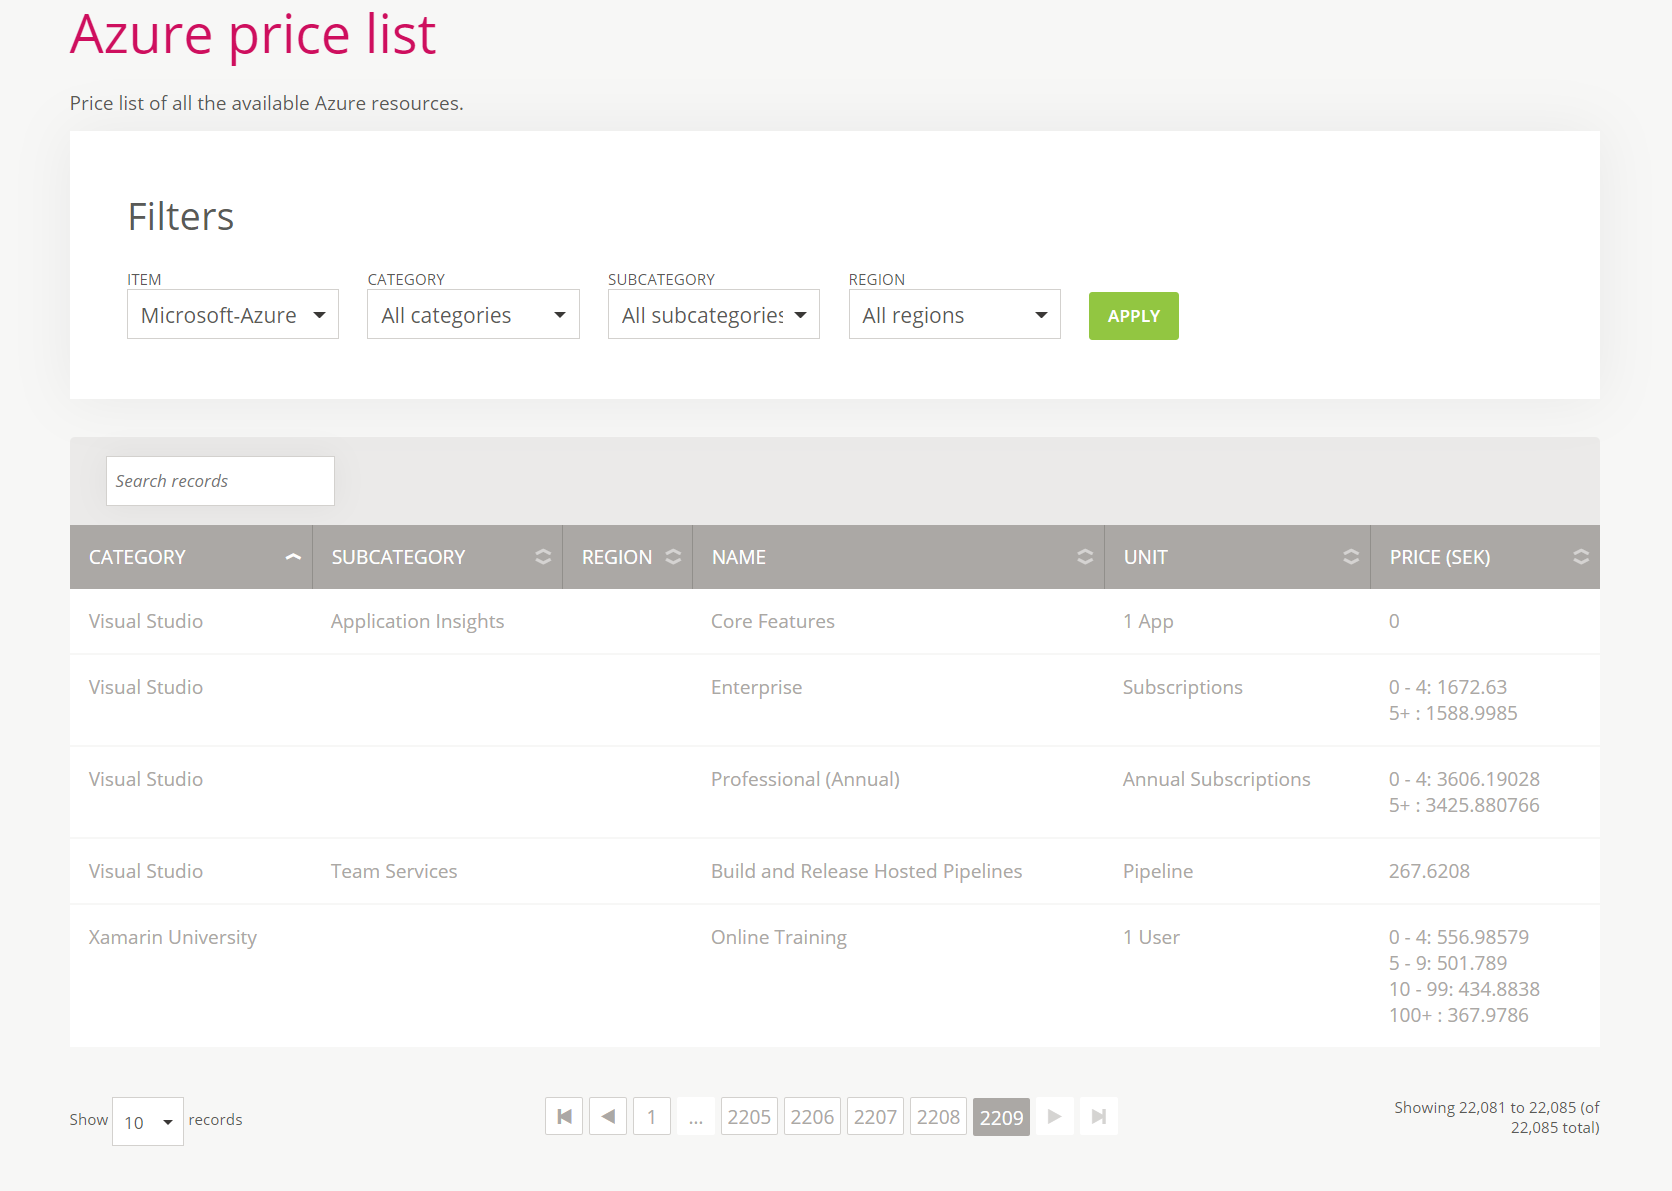
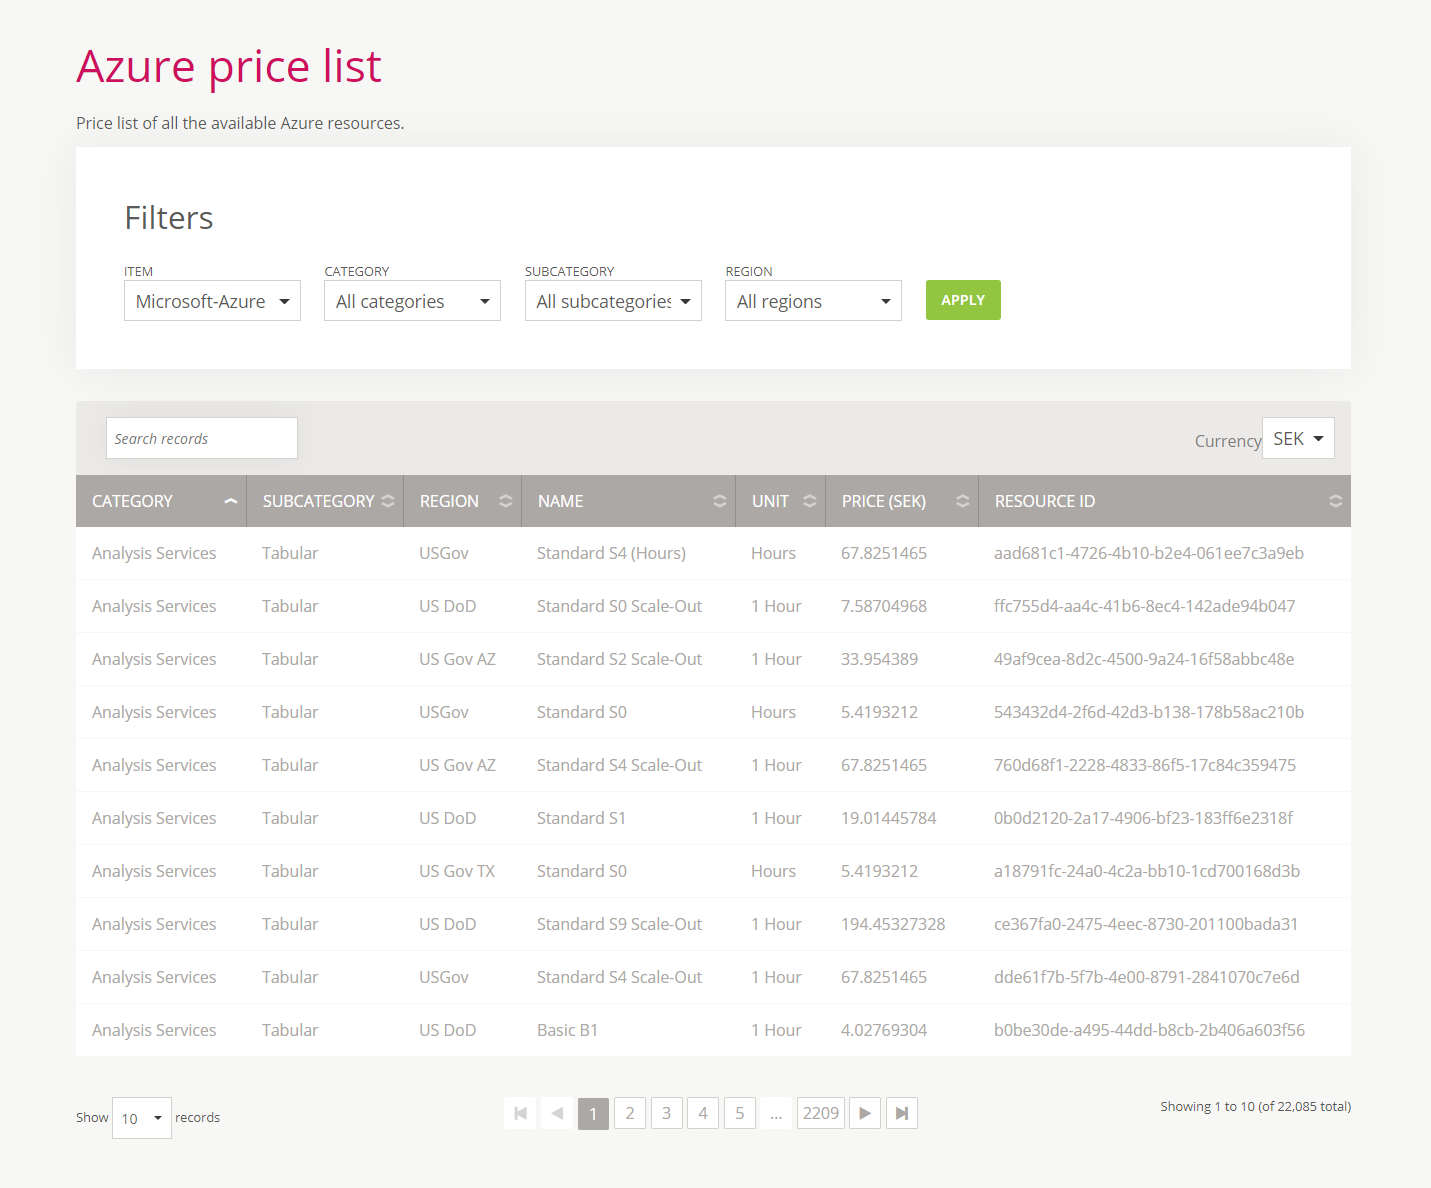
Azure price list
This page contains the list of all the available Azure resources with prices formatted for the specific account. Prices include markups from resellers and taxes for an account and can include multiple ranges.
Resource list includes resource name, category, subcategory, region, unit, and price.
Calculating price for a quantity:
Let’s take an example from the table: if you want to buy 6 subscriptions of Visual Studio Enterprise (second row), for the first four subscriptions you’ll pay 1672.63 * 4 and for remaining two you’ll pay 1588.9985 * 2, which would be a 9,868.517 SEK in total.
Reseller’s view
If the page is displayed under reseller’s account, resource list includes additionally resource Id, so they can add markups per resource.
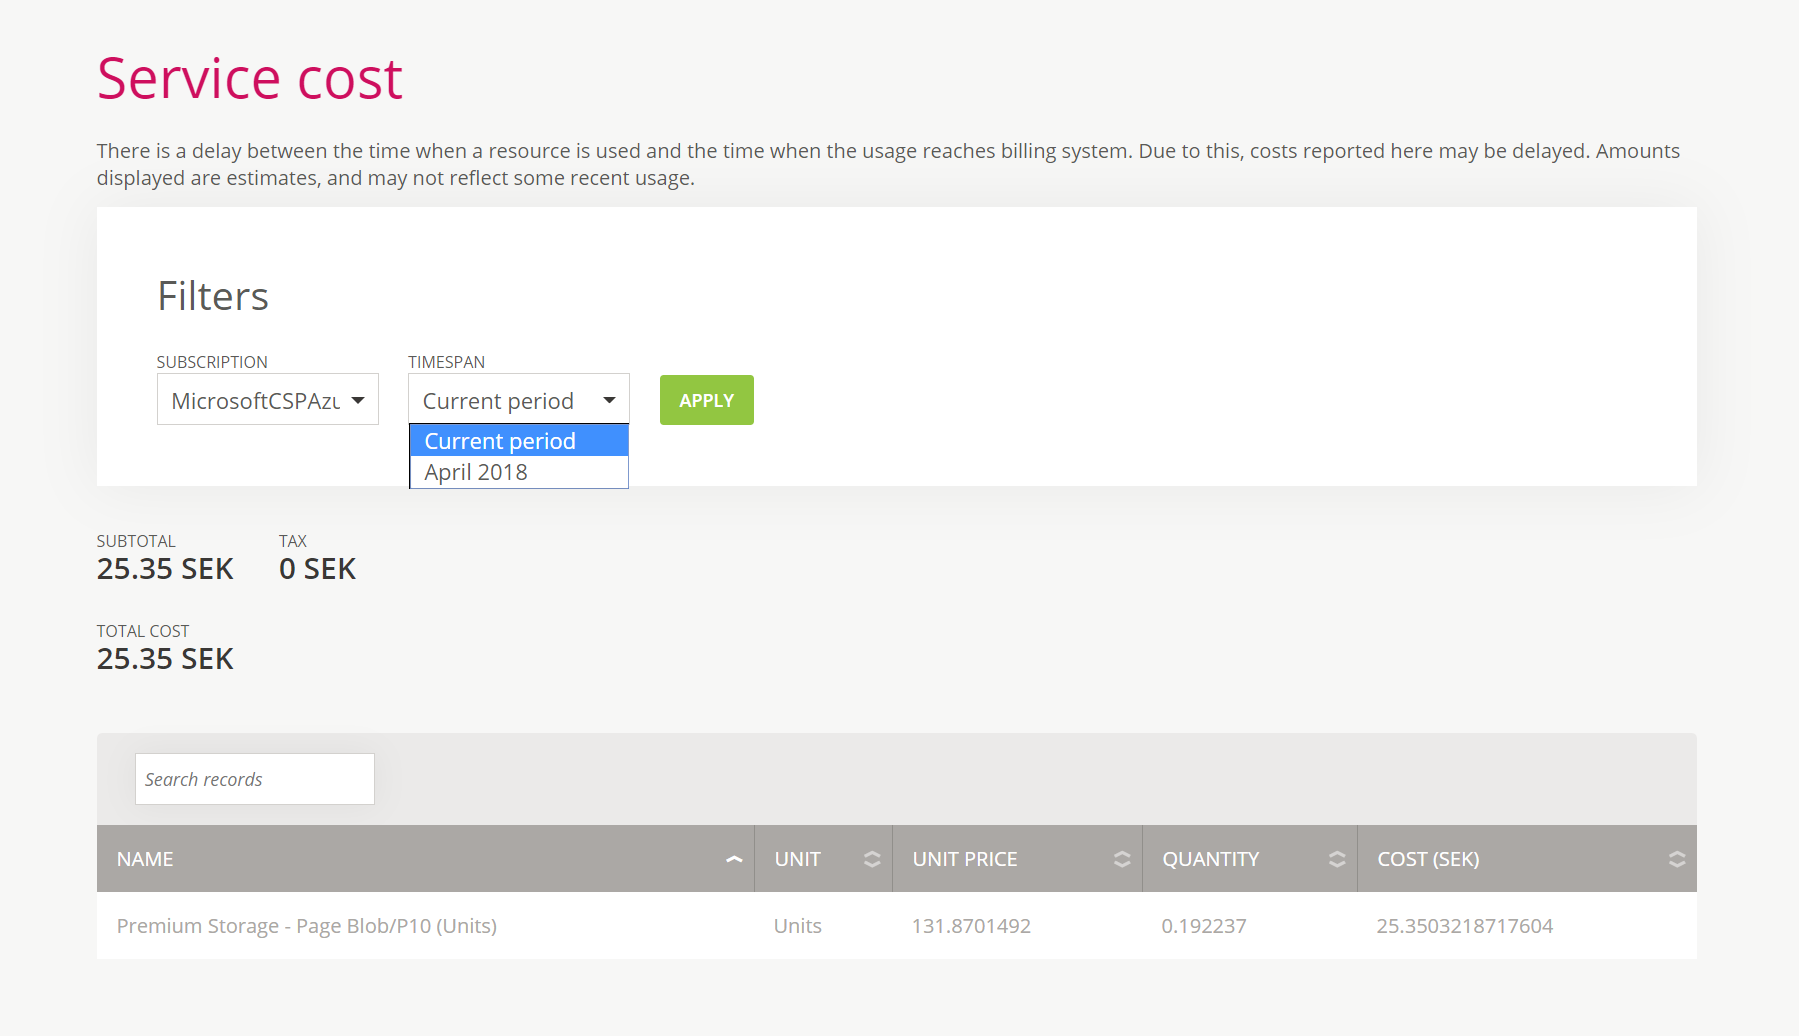
Azure service cost
This page contains an overview of running cost for current billing period and invoices from previous months, per subscription. There is also a list of usages for a billing period with information about resource name, unit, unit price, quantity, and subtotal.
Reseller’s view
If the page is displayed under reseller’s account, then the overall cost of Azure to the reseller company is shown.
Appendix A – Microsoft’s billing
Microsoft charges for the usage consumed during one billing period. The billing period starts on a specific day in the month and each CSP has its own billing period. The prices that are used are from the CSP’s rate card (each CSP has its own rate card). Rates used are the ones valid at the start of the billing period for existing Azure subscriptions. For new subscriptions made during the billing period, rates on the subscription creation date are used.
Rates are per Azure resource and some resources can have rates based on ranges. Ranges have a minimum quantity and a rate for that range.
For example, if there is a resource with ranges:
Minimum quantity | Rate
0 | 3.1
5 | 2.1
10 | 1.1
and the consumed usage for the billing period was for example 12, the price would be:
4*3.1 + 5*2.1 + 3*1.1 = 26.2
If the Azure resource happens to have some included quantity, then the above calculation would be for the included quantity of 3 for example:
usage for invoicing is 12 – 3 = 9
4*3.1 + 5*2.1 = 22.9