How to set up limitations for the adding and resizing of virtual machines using sliders.
Overview
By controlling the adding and resizing of virtual machines, the customer is offered an alternative to the standard “pre packaged” instance type. This is implemented by dynamically getting the flavor from OpenStack that matches the provided variables for RAM, CPU and disk.
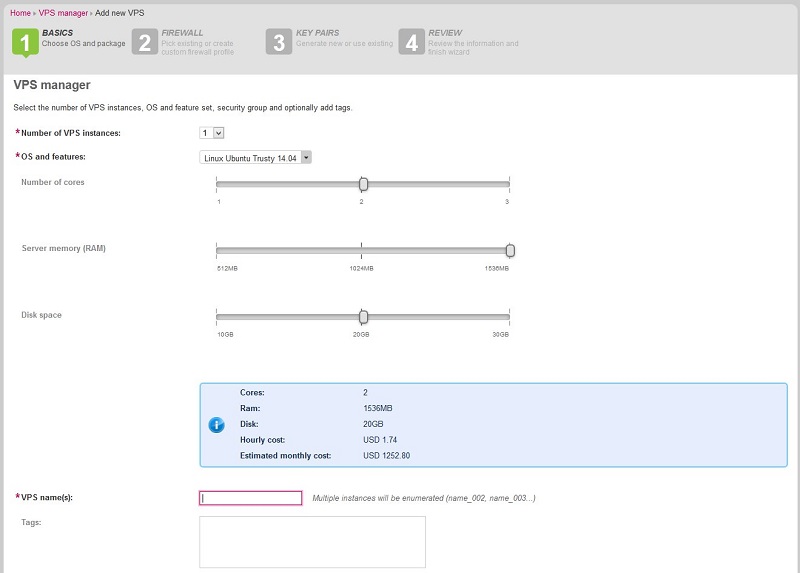
Image: Adding a new VPS manager.
Adding flavors to OpenStack
- Before running the below script, make sure you have set the required environment variables to access the OpenStack APIs as an Admin user.
- Add flavors for all combinations of RAM, CPU and Disk that you want to offer. This is done by using a simple shell script that takes care of the rest for you. Simply modify the min and max variables at the top to fit your needs.
#!/bin/sh

# Modify to fit your needs
# RAMSTEP is how large each step is, for example 512, 1024, 1536, 2048 etc...
# RAMMIN is the minumum value
# RAMMAX is the maximum value
RAMSTEP=512
RAMMIN=512
RAMMAX=1536

# Modify to your liking
CPUSTEP=1
CPUMIN=1
CPUMAX=3

# Modify to your liking
DISKSTEP=10
DISKMIN=10
DISKMAX=30

# No need to modify anything more :)

CPUCOUNT=$CPUMIN
RAMCOUNT=$RAMMIN
DISKCOUNT=$DISKMIN

while [ $CPUCOUNT -le $CPUMAX ]
do
   while [ $RAMCOUNT -le $RAMMAX ]
   do
         while [ $DISKCOUNT -le $DISKMAX ]
         do
            FLAVORID="${CPUCOUNT}x${RAMCOUNT}x${DISKCOUNT}"
            echo "Creating flavor $FLAVORID"
            nova flavor-create $FLAVORID $FLAVORID $RAMCOUNT $DISKCOUNT $CPUCOUNT --is-public=true
            DISKCOUNT=`expr $DISKCOUNT + $DISKSTEP`
         done
         DISKCOUNT=$DISKMIN
         RAMCOUNT=`expr $RAMCOUNT + $RAMSTEP`
   done
   RAMCOUNT=$RAMMIN
   CPUCOUNT=`expr $CPUCOUNT + $CPUSTEP`
done
Setting up products
Create the following counters for RAM, CPU and disk in your cloud VPS product (VPS-LINUX):
CPU counter:
- Counter id: cpu
- Counter name: CPU cores
- Counter description: CPU core hours
- Unit name: h
- Measurement unit: 1.0
- Ranges: At least 1 price range
Disk counter:
- Counter id: disk
- Counter name: Disk usage
- Counter description: Total disk usage
- Unit name: GB
- Measurement unit: 1.0
- Ranges: At least 1 price range
RAM counter:
- Counter id: ram
- Counter name: RAM
- Counter description: Memory usage
- Unit name: h
- Measurement unit: 256 (Define price for each 256MB of memory)
- Ranges: At least 1 price range
Setting up Automation Server
- Open the OpenStack module configuration file on the Automation Server machine at the location C:\Program Files (x86)\Atomia\AutomationServer\Common\Modules\Atomia.Provisioning.Modules.OpenStack.dll.config.
- Add the above counters to InstanceTypes.
- Make sure to add the images which you intend to use to the list of available_images.
  "AvailableInstanceTypes": [
        {
            "name": {
                "default": "Cpu"
            },
            "description": {
                "default": "Amount of cpu available"
            },
            "instance_type": "cpu",
            "available_images": [
                "7679d9d1-172b-48f4-82e5-3c5bd8ff9bab",
                "02c3637f-85db-4f94-9fc3-9a84cb8e03f2"
            ]
        },
        {
            "name": {
                "default": "Ram"
            },
            "description": {
                "default": "Amount of RAM available"
            },
            "instance_type": "ram",
            "available_images": [
                "7679d9d1-172b-48f4-82e5-3c5bd8ff9bab",
                "02c3637f-85db-4f94-9fc3-9a84cb8e03f2"
            ]
        },
        {
            "name": {
                "default": "Disk"
            },
            "description": {
                "default": "Amount of disk available"
            },
            "instance_type": "disk",
            "available_images": [
                "7679d9d1-172b-48f4-82e5-3c5bd8ff9bab",
                "02c3637f-85db-4f94-9fc3-9a84cb8e03f2"
            ]
        },
Configuring sliders in Hosting Control Panel
- Open the configuration file on the Hosting Control Panel server on the path C:\Program Files (x86)\Atomia\HostingControlPanel\bin\Atomia.Web.Plugin.VPS.dll.config.
- Locate the configuration related to sliders that looks like below by default:
 <pluginSetting name="UseSliders" value="false" />
 <pluginSetting name="SliderConfig" value='{"VPS-LINUX" : {"cpu" : { "start":1,"min":1,"max":3,"step":1, "labels" : ["1","2","3"] }, "ram" : { "start":512,"min":512,"max":1536,"step":512, "labels" : ["512MB","1024MB","1536MB"] } , "disk" : { "start":10,"min":10,"max":30,"step":10, "labels" : ["10GB","20GB","30GB"] }}}' />
- Enable the UseSliders setting and modify the SliderConfig.
- The configuration format for each slider in SliderConfig looks like below:
"ram" : { "start":512,"min":512,"max":1536,"step":512, "labels" : ["512MB","1024MB","1536MB"] }
- Start is the initial value of the cpu/ram/disk slider, in this case 512.
- Min is the minimum value of the slider, in this case 512.
- Max is the maximum value of the slider, in this case 1536.
- Step is how large each step of the slider is, in this case 512.
- Labels defines the text on the slider.
Enabling usage data collection
- Go to Admin Panel > Settings > Plugin configuration > Scheduled Tasks: Usage data collection.
- Modify the Using sliders configuration to true.
- Make sure that the scheduled task UsageDataScheduledEventHandler is set to run at Admin Panel > Settings > Scheduled task settings.